Peliqan Machines let you build and host web apps on Peliqan. Use Peliqan AI to build your app, connect your own coding agent, or import an existing project. For example, you can build a sales dashboard, a customer portal or an internal tool that works with your Peliqan data. Develop and test the app in Development, then publish a separate release for your users in Production.

Machines or Data Apps?

Peliqan supports both Machines and Data Apps. The standard Machine starter uses React, TypeScript and TanStack Start, with a Python/FastAPI backend. You can also import an existing project. Check its development command and production build before publishing.

Create a Machine

You need access to Peliqan Machines and permission to create a Machine in the selected group.
  1. In Peliqan, go to Peliqan Machines in the left menu.
  2. Click New Machine, enter a Machine name and select a Group.
  3. Describe what you want to build and click Build with Peliqan AI. Continue the conversation to work out the screens, data and actions your app needs.
  4. Review the proposed data access and capabilities before you choose Create and build.
  5. Open the Machine to review the code and test its Development preview.
For example, you can start with:
Build a sales dashboard with a date filter, monthly revenue chart and a table of open orders. Use the sales data in this group. The dashboard should only read data.
To create a Machine without Peliqan AI, enter a Machine name, select a Group and click Build with your agent. In the workspace, open Connect your agent to connect your coding agent.
Discussing access in the planning chat does not enable it. A group admin must approve the Machine’s Peliqan data access. You can leave access off and configure it later.

Development and Production

Development is your editable workspace. Production runs the release that you have published.

Test your app

Open Preview to test the app. If the workspace is stopped, click Start preview. You can also start or restart it under Settings. Start a stopped Development preview The Development workspace stops after a period of inactivity. Start it again when you want to continue working. A Development preview URL is temporary and requires a Peliqan user with permission to view the Machine. Use Code to browse and edit project files. Save your changes before publishing. Use Peliqan AI in the Machine workspace to continue building or to investigate an error.

Connect your own coding agent

You can work with a coding agent such as Claude Code from your own computer.
  1. Open Connect your agent in the Machine workspace.
  2. Install the Peliqan CLI using the command shown for your operating system. Python 3 and OpenSSH are required.
  3. Sign in and connect to the Machine using the commands shown in the dialog:
  1. Click Download instructions and give the downloaded instructions.md file to your agent.
  2. Ask your agent to follow those instructions when editing and testing the app.
The agent connects to Development. Publishing to Production is a separate operation.

Import an existing project

In Code, use Import ZIP or Import GitHub repository. Review the files and the app’s startup instructions, then test the Development preview. Importing a GitHub repository copies its files into the Machine. It does not set up continuous synchronisation with GitHub. For a custom production build, add a Dockerfile at the project root. See Advanced: custom Dockerfiles.

Connect to Peliqan data

Open Connectivity to Peliqan backend to review or change the Machine’s connection. A group admin manages these settings. Choose the table access your app needs:
  • No access: the Machine cannot access Peliqan tables through its managed connection.
  • Read-only: the Machine can read rows and explore table schemas in its group.
  • Read and write: the Machine can also create, update and delete rows in its group.
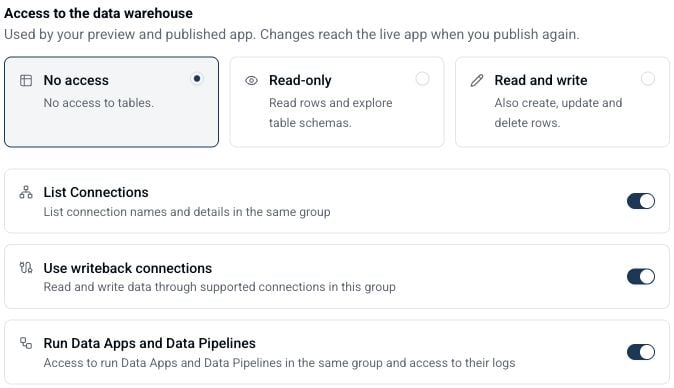
Table access covers the current and future tables in the Machine’s group. Use a separate group when an app should have access to a different set of data. The following capabilities are configured separately from table access: Table access and the separate Machine capability switches Select only the capabilities needed by your app. For example, a dashboard that only reads warehouse tables does not need writeback or workflow execution. A workflow can change data even when the Machine’s direct table access is read-only or off. Click Save configuration after changing the settings. Development applies the saved configuration; publish again to update Production. Revoking managed access can affect a live app immediately, so review the impact before removing a connection.
Peliqan manages the Machine’s backend credentials. You do not need to copy your personal Peliqan API key into the app. Use managed credentials only from the backend, and store other secret values in environment settings.

Choose who can open your app

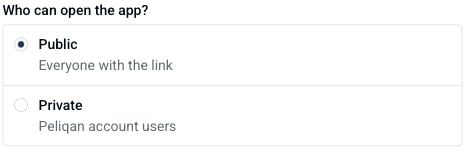
In the Publish dialog, choose one of the following authentication options: Public and Private access options for a published Machine Private requires a Peliqan login. Users can use the login methods enabled for their account, such as a password, Microsoft or Google. See User management and SSO with Microsoft. Public and Private control who can access the application itself. They do not define user-specific permissions inside the app. To add your own login flow and access Peliqan data on behalf of the signed-in user, see How to integrate with the Peliqan OAuth2 server.
Add environment variables

Store external API credentials and other runtime settings under Settings > Environment variables.
  1. Click Add secret.
  2. Enter the variable name and value.
  3. Save the setting. Development reloads to apply it; start the preview if it is stopped.
  4. Publish again when the setting should be used by Production.
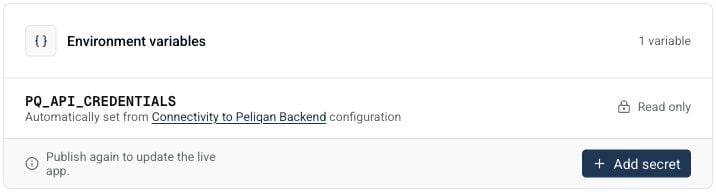
Environment settings with a read-only managed Peliqan credential Values are stored encrypted. Existing values are not displayed again. Replace a value if you need to change it. Variables managed by Peliqan, such as PQ_API_CREDENTIALS, are read-only. Configure these through Connectivity to Peliqan backend. Platform variables and browser-public prefixes, such as PORT and VITE_, are reserved.
Keep secrets out of frontend code, source files and Docker images. Frontend code is delivered to the user’s browser. Set runtime secrets in the Machine settings and read them from the backend.

Publish your app

Publish when you want a separate production release for your users.
  1. Save your changes and test the Development preview.
  2. Click Publish.
  3. Choose the app’s URL name and Public or Private access.
  4. Review the Production memory allocation and click Publish in the dialog.
  5. Follow the build and security-check progress. Review any findings that need attention.
  6. Once the release is live, use Open live app to test the published URL.
Publishing uses a snapshot of the saved code, environment variables, approved Peliqan data access and visitor-access setting. Later workspace changes do not automatically update that release.

Review security findings

Open Findings to inspect the available scan results. Publishing checks both the saved source and the built production image.
  • Critical findings or detected secrets block publishing. Fix the issue and publish again.
  • High findings require review and an explicit Approve & deploy action by an authorised user.
  • Medium findings remain visible for review.
  • A missing, failed or incomplete required scan must be resolved before deployment can continue. It is not an approval that can be bypassed.
Approval applies to the reviewed release and expires after 24 hours. Changes to the source or build may require a new review. If a new publish fails or is waiting for approval, the current live release keeps running. Use View deployment logs to investigate the failed attempt. Scans help find issues, but do not replace testing the app and reviewing its access rules.

Restore the previous live release

When an eligible previous release is available, open Publish and choose Restore previous release. Review the confirmation before continuing. This restores the earlier successful code and image while keeping the current live release’s environment variables, Peliqan access and visitor-access settings. It does not revert credentials to an older value.

Configure Production memory

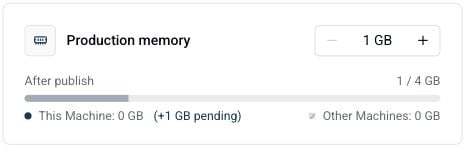
Open Settings > Production memory, or select the allocation in the Publish dialog. Choose between 1 GB and 4 GB, in steps of 1 GB, within the available capacity of your account. The allocation display shows the memory assigned to this Machine and to other Machines in the account. Production memory and the account allocation display Click Apply changes to resize an active Production app. This restarts the app without publishing new code. If the app is not published yet, the saved allocation applies on its next publish. See Advanced: CPU and memory for the runtime limits.
Workspace history

Open History to see saved checkpoints from manual changes, Peliqan AI and connected coding agents, together with successful published releases.

Preview a checkpoint

Click Preview on a checkpoint to inspect its saved frontend. This runs in a browser sandbox and does not start or change the Development workspace. A history preview is a visual preview. It does not run the saved backend. Features that depend on API calls, browser storage, external runtimes or server rendering may be unavailable. Dependency downloads can also take time or fail. Preview links require sign-in and permission to view the Machine. A link expires after 24 hours; reopen it from History to generate a new one.

Restore a checkpoint

Click Restore and confirm to replace the Development source with the selected checkpoint. Peliqan creates a recovery checkpoint before restoring changed source. Restoring workspace history does not change environment variables, Peliqan connectivity or the live Production release. Test the restored code in Development, then publish if you want it to become live.

Troubleshooting

The preview has stopped

Development can stop after inactivity. Open Preview or Settings and click Start preview. Check the startup logs if it does not become ready.

My saved changes are not in the live app

Saving changes updates Development. Publish again to create a production release with the new code and settings. Check the live release and its deployment logs if a publish did not finish.

A source file is rejected before scanning

Source validation checks file paths, file sizes, secret files and credential patterns before a scan or build starts. Store secret values in environment variables and read them from backend code. If ordinary text is being incorrectly identified as a credential reference, contact Peliqan Support with the error and file path.

A history preview is blank or shows a dependency error

Retry the preview, or open it again from History. A rendered page may still have an unavailable dependency or feature. Use Development to test the full app with its backend and approved connection settings.

I cannot apply a memory change

Check the account allocation display and wait for any publish in progress to finish. Another Production Machine may be using the available memory. If a previous resize could not be confirmed, retry Apply changes and check the deployment status.

Advanced

For custom Dockerfiles, cron jobs, the container OS, resource limits and network restrictions, see Advanced Machine configuration. Scheduled background work can also run as a scheduled Data App, independently of the web app.

More info